
Using SocketIO with Django Rest Framework, and Django ASGI application.


Table of contents
Tired of setting up Django channels? Need a more friendly library to work with? Then you can use SocketIO. I don't see many people using it with django which is why I'm writing this blog to let you guys know you can also use socketIo with ASGI servers in django.
Technologies Used in this Tutorial
We'll make use of the following dependencies/technologies
- gunicorn and uvicorn to run the server
- a redis server for the sockets.
- python-socketio for the SocketIO library
- django
- django rest framework
I'll take you step by step through the process
Implementation
Let's create a project "core" and an app "chat".
First of all, let's set up our models.
chat/models.py
from django.contrib.auth.models import User
import uuid
from django.utils import timezone


class Chat(models.Model):
    initiator = models.ForeignKey(
        User, on_delete=models.DO_NOTHING, related_name="initiator_chat"
    )
    acceptor = models.ForeignKey(
        User, on_delete=models.DO_NOTHING, related_name="acceptor_name"
    )
    short_id = models.CharField(max_length=255, default=uuid.uuid4, unique=True)


class ChatMessage(models.Model):
    chat = models.ForeignKey(Chat, on_delete=models.CASCADE, related_name="messages")
    sender = models.ForeignKey(User, on_delete=models.DO_NOTHING)
    text = models.TextField()
    created_at = models.DateTimeField(default=timezone.now)
Next let's set up an endpoint we can use to fetch messages
chat/serializers.py
from rest_framework import serializers
from .models import Chat, ChatMessage


class MessageSerializer(serializers.ModelSerializer):
    class Meta:
        model = ChatMessage
        exclude = ("chat",)


class ChatSerializer(serializers.ModelSerializer):
    messages = MessageSerializer(many=True, read_only=True)
    class Meta:
        model = Chat
        fields = ["messages", "short_id"]
chat/views.py
from rest_framework.generics import GenericAPIView
from rest_framework.permissions import IsAuthenticated
from rest_framework.response import Response
from rest_framework import status
from .serializers import ChatSerializer
from .models import Chat


class GetChat(GenericAPIView):
    permission_classes = [IsAuthenticated]
    serializer_class = ChatSerializer

    def get(self, request):
        chat, created = Chat.objects.get_or_create(initiator__id=request.user.pk)
        serializer = self.serializer_class(instance=chat)
        return Response({"message": "Chat gotten", "data": serializer.data}, status=status.HTTP_200_OK)
chat/urls.py
from django.urls import path
from .views import GetChat

urlpatterns = [
    path("all", GetChat.as_view(), name="get-chats"),
]
core/urls.py
from django.contrib import admin
from django.urls import path, include

urlpatterns = [path("admin/", admin.site.urls), path("chat/", include("chat.urls"))]
Next lets setup our socketIO application so
Let's create a file named sockets.py in the chat app
Get your redis url and add to the client manager
We have to use sync_to_async to communicate with django orm since it doesn't support async.
On the connect event we can receive a dictionary called auth from the client. The client can pass in the chat_id so we can put the connection in a room. This is to prevent messages from being broadcasted to all connections. You can also receive a token you can use to protect your connections.
So we listen to a "message" event from the client, when we get it we convert the json data to a dictionary, then we create a message in the database and emit it on a "new_message" event for the client to display.
chat/sockets.py
import socketio
from utils import config
import json
from django.shortcuts import get_object_or_404
from django.contrib.auth.models import User
from .models import Chat, ChatMessage
from .serializers import MessageSerializer
from asgiref.sync import sync_to_async

mgr = socketio.AsyncRedisManager(config.REDIS_URL)
sio = socketio.AsyncServer(
    async_mode="asgi", client_manager=mgr, cors_allowed_origins="*"
)


# establishes a connection with the client
@sio.on("connect")
async def connect(sid, env, auth):
    if auth:
        chat_id = auth["chat_id"]
        print("SocketIO connect")
        sio.enter_room(sid, chat_id)
        await sio.emit("connect", f"Connected as {sid}")
    else:
        raise ConnectionRefusedError("No auth")


# communication with orm
def store_and_return_message(data):
    data = json.loads(data)
    sender_id = data["sender_id"]
    chat_id = data["chat_id"]
    text = data["text"]
    sender = get_object_or_404(User, pk=sender_id)
    chat = get_object_or_404(Chat, short_id=chat_id)

    instance = ChatMessage.objects.create(sender=sender, chat=chat, text=text)
    instance.save()
    message = MessageSerializer(instance).data
    message["chat"] = chat_id
    message["sender"] = str(message["sender"])
    return message


# listening to a 'message' event from the client
@sio.on("message")
async def print_message(sid, data):
    print("Socket ID", sid)
    message = await sync_to_async(store_and_return_message, thread_sensitive=True)(
        data
    )  # communicating with orm
    await sio.emit("new_message", message, room=message["chat"])


@sio.on("disconnect")
async def disconnect(sid):
    print("SocketIO disconnect")
Note: When testing on postman you might have to remove the auth feature since postman doesn't support it yet.
chat/sockets.py
# establishes a connection with the client
@sio.on("connect")
async def connect(sid, env):
    chat_id = "7ce6aa6a-208a-4c1e-8f96-ebeb8eb16996"
    print("SocketIO connect")
    sio.enter_room(sid, chat_id)
    await sio.emit("connect", f"Connected as {sid}")
Next we mount our socketio app on the asgi application
core/asgi.py
import os

from django.core.asgi import get_asgi_application

os.environ.setdefault('DJANGO_SETTINGS_MODULE', 'blaqchat.settings')
django_asgi_app = get_asgi_application()


# its important to make all other imports below this comment
import socketio
from chat.sockets import sio


application = socketio.ASGIApp(sio, django_asgi_app)
Now we have to run our server with uvicorn. You can create a server.py file in your base directory.
Note: When installing uvicorn run pip install "uvicorn[standard]" to get uvicorn's support for websockets
import uvicorn

if __name__ == "__main__":
    uvicorn.run("core.asgi:application", reload=True)
Ensure you installed redis, python-socketio and other required dependencies. Also your redis server has to be active in the background also for your app to run properly.
Now we can run our server
python server.py
INFO:     Uvicorn running on http://127.0.0.1:8000 (Press CTRL+C to quit)
INFO:     Started reloader process [39290] using WatchFiles
INFO:     Started server process [39292]
INFO:     Waiting for application startup.
INFO:     ASGI 'lifespan' protocol appears unsupported.
INFO:     Application startup complete.
You can test with postman. Remember to disable the "auth" feature.

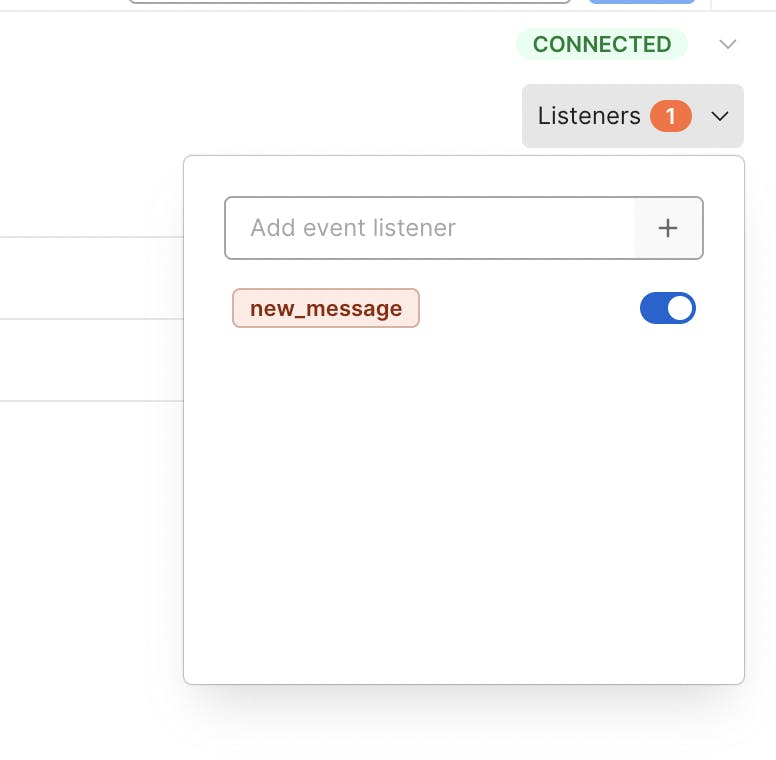
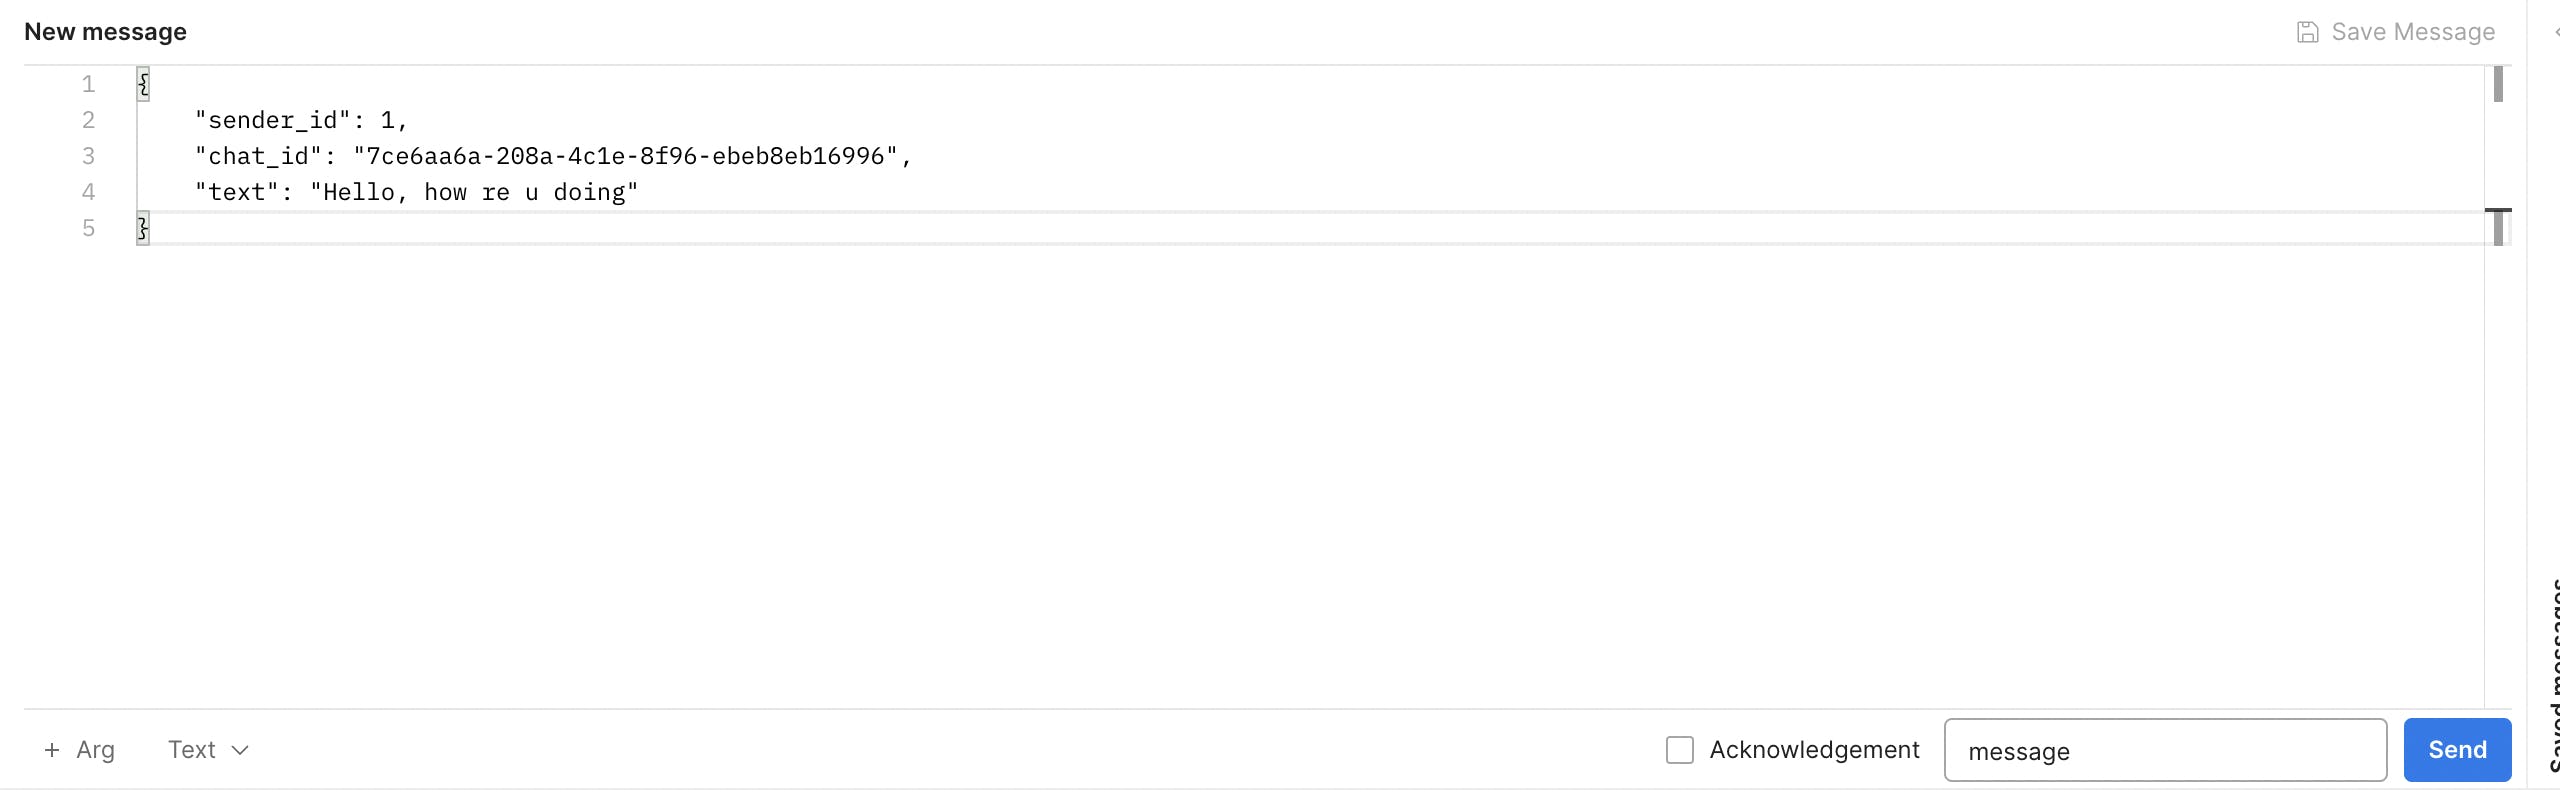
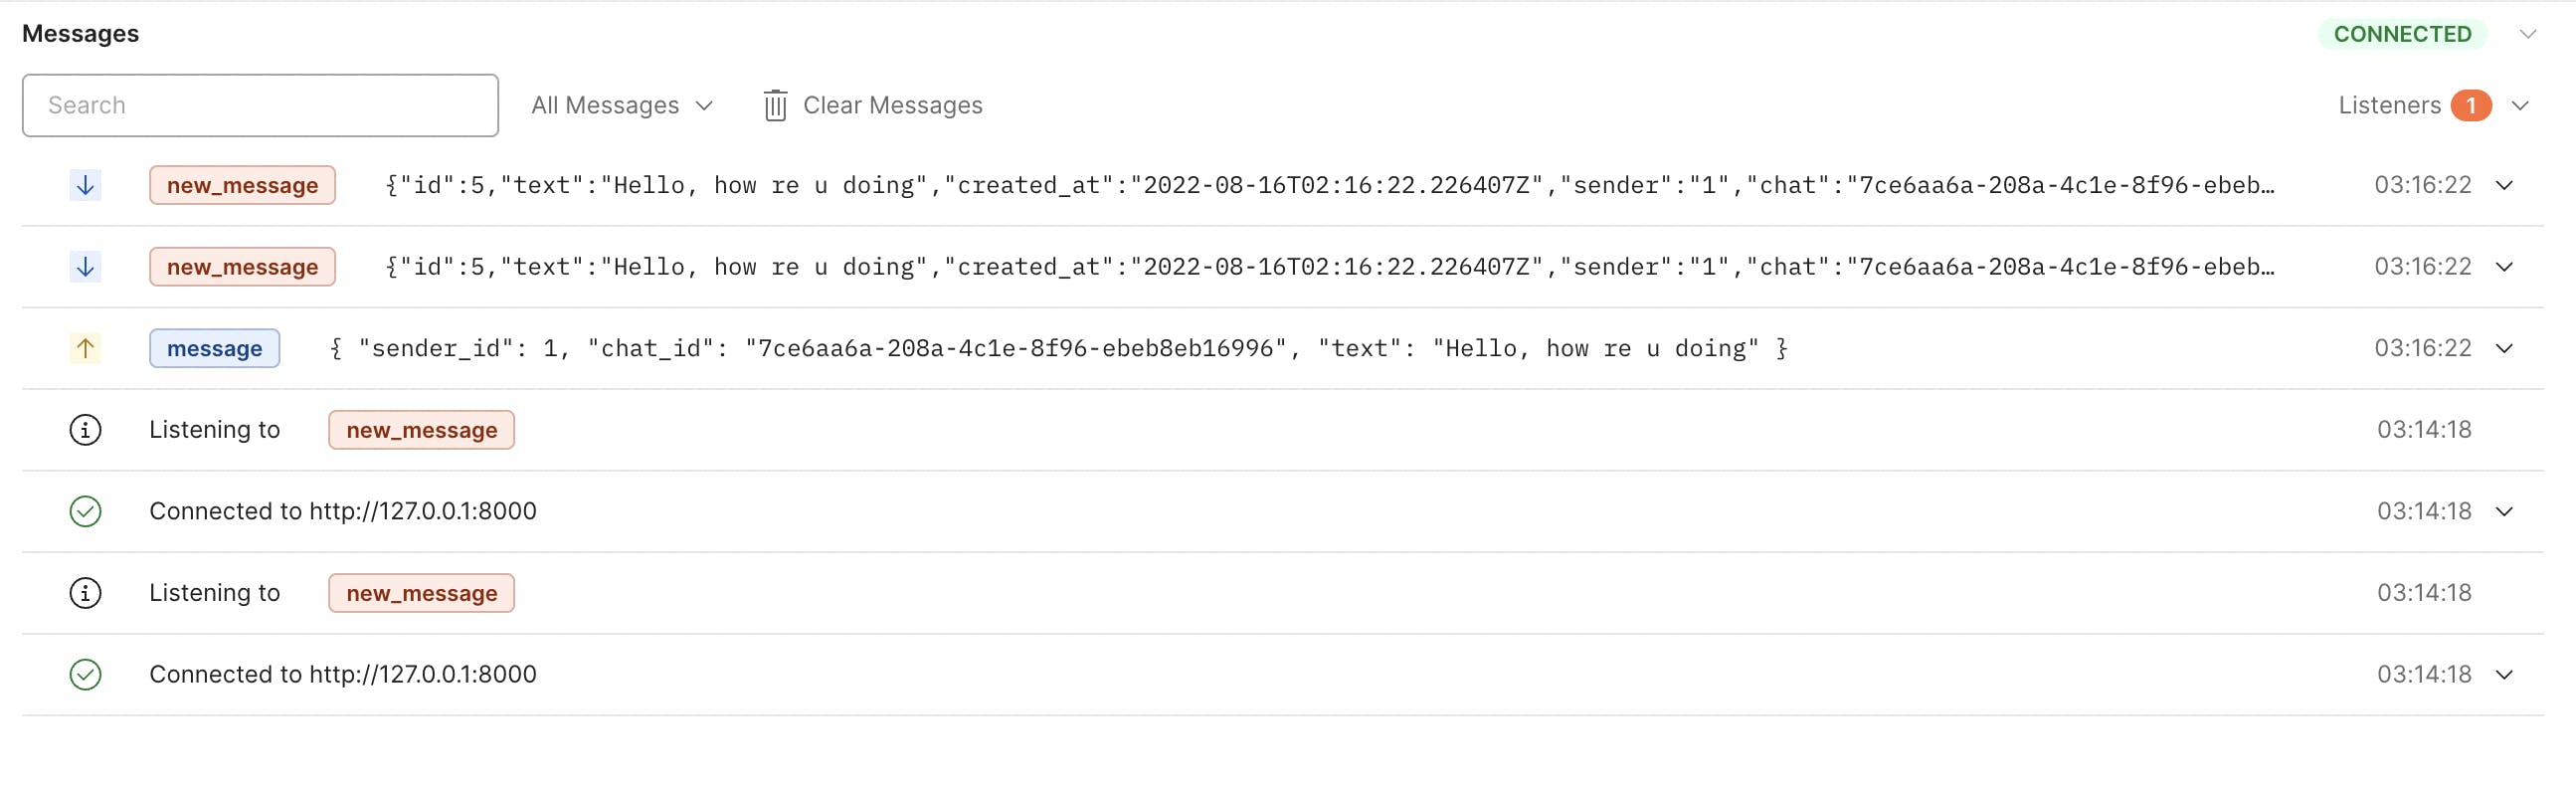
Let's try sending a message. We have to listen to a "new_message" event on the client-side and send a "message" event.
Then a message with a "message" event.
Then let's check our response
And that's all.
Conclusion
Here are some useful tips to note;
If you face a db connection issue you can use pgbouncer to help close connections.
It's better to use gunicorn with uvicorn in production than uvicorn alone.
Thanks for reading.